How to Draw a Cat – Step-by-Step Beginner Guide
Learning to draw a cat begins with understanding basic shapes and proportions. Whether aiming for a whimsical cartoon or a detailed realistic portrait, beginners can achieve recognizable results using simple techniques developed by art educators.
The process requires minimal materials—typically a pencil, eraser, and paper—and follows logical steps from gesture lines to refined details. Multiple instructional approaches exist, ranging from grid-based methods for accuracy to shape-building techniques that emphasize fluidity.
This guide synthesizes established drawing methods used in beginner tutorials, covering essential supplies, step-by-step construction, and common pitfalls to avoid during the learning process.
How Do You Draw a Cat Step by Step?
Graphite pencil, kneaded eraser, drawing paper
10-30 minutes for sketches; 45-60 with color
Suitable for complete beginners
Cute cartoon and realistic approaches
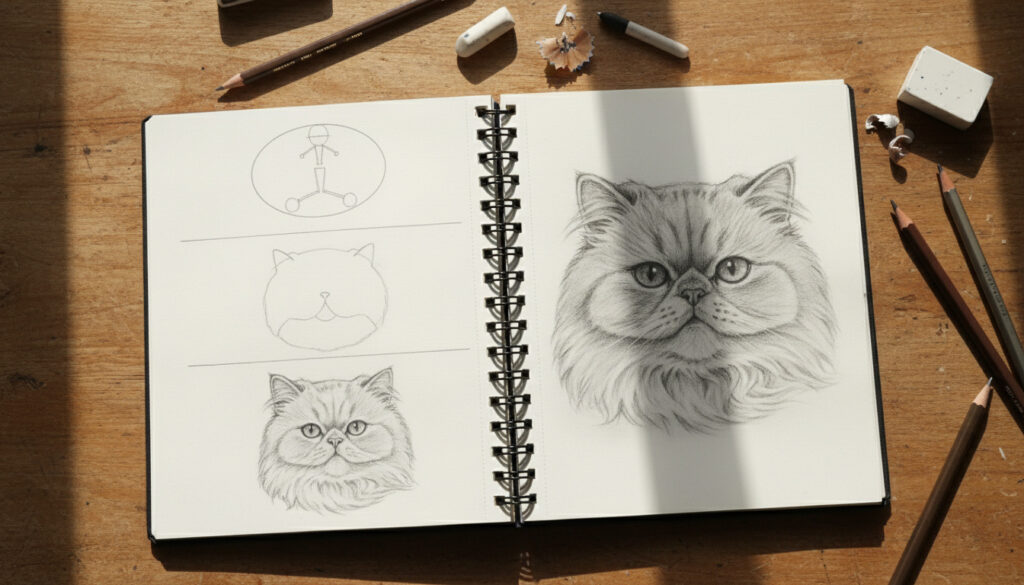
Successful cat drawings rely on foundational construction techniques that break complex anatomy into manageable components. The following principles appear consistently across instructional materials for beginners:
- Start with light, loose circles to establish head and body proportions without committing to dark lines
- Employ a kneaded eraser to lift graphite cleanly without damaging paper fibers or leaving residue
- Offset the body circle halfway down the chest circle to create natural sitting poses
- Build fur texture using short, directional strokes rather than smooth continuous outlines
- Remove all construction lines before adding final details to prevent visual clutter
- Maintain consistent reference to photographic guides when aiming for realistic proportions
- Use grid divisions on reference photos to transfer accurate feature placement
| Anatomical Element | Construction Detail | Functional Purpose |
|---|---|---|
| Head shape | Oval or circular foundation | Provides base for facial symmetry and ear placement |
| Head-to-chest ratio | Equal circle sizes | Maintains proportional accuracy for sitting felines |
| Body mass | 1.5 times larger than chest circle | Creates realistic torso volume and silhouette |
| Grid measurements | 7 by 7.75 inch reference divisions | Enables precise transfer of facial features |
| Ear placement | Triangular forms at upper grid corners | Positions ears correctly without touching outer edges |
| Pencil pressure | Light, loose grip during initial sketch | Allows complete erasure of guidelines |
How to Draw a Cute Cat?
Cartoon styling emphasizes exaggerated proportions that trigger immediate visual appeal. Artists typically position oversized eyes lower on the facial oval and use vibrant, non-naturalistic color patterns such as hearts, stripes, or polka dots to enhance the whimsical effect.
Exaggerating Features for Appeal
The cute aesthetic relies on specific proportional distortions. Large, almond-shaped eyes occupy significant facial real estate, while the nose and mouth shrink to minimal triangular forms. Video tutorials demonstrate variations including Sanrio-style characters and rainbow-colored fur patterns that depart entirely from biological accuracy.
Color Application Methods
Layering colored pencils creates depth without complex shading. Artists often apply base coats of yellow, green, or blue to the face, then add contrasting circles or stripes to the ears and eye areas. Multicolored eyes with internal patterns enhance the fantastical quality.
Cute cartoon cat drawings utilize sleek, continuous lines without jagged fur tufts, whereas realistic sketches require broken, textured outlines. The distinction lies primarily in line quality rather than anatomical structure.
How to Draw a Realistic Cat?
Realistic rendering demands precise attention to anatomical ratios and surface texture. Unlike cartoon methods, this approach requires careful observation of how light interacts with fur and how skeletal structure influences surface contours.
Grid Method Construction
The grid technique involves dividing a reference photograph into equal horizontal and vertical sections, then replicating those divisions on drawing paper. For standard facial portraits, artists draw a 7 by 7.75 inch rectangle, establishing halved lines at 3.5 inches vertical and 3.875 inches horizontal. Step-by-step instructions indicate placing ears in the upper corners without touching the edges, while aligning the chin to the bottom center intersection.
Fur Texture Techniques
Creating convincing fur requires directional mark-making that follows the hair growth patterns. Short, overlapping pencil strokes build texture, with darker lines indicating shadows beneath the chin and along the spine. Advanced tutorials recommend varying stroke length to distinguish between short facial fur and longer body hair.
For clean whisker lines, draw them first on overlay paper, then indent the line into the final sheet. This creates a faint groove that guides ink or dark pencil without visible preliminary sketch marks.
What Are Common Mistakes When Drawing a Cat?
Beginners frequently encounter specific technical errors that flatten their drawings or make correction difficult. Recognizing these patterns early prevents frustration and reduces paper waste.
Pressure and Line Quality Errors
Excessive pressure during initial sketching grounds graphite into paper fibers, creating permanent smudges that resist erasure. Drawing instructors emphasize maintaining a loose grip until the final inking or darkening phases.
Proportional Inaccuracies
Eyeballing measurements without construction circles or grid references frequently produces asymmetrical ears or misaligned facial features. Smooth, continuous outlines around the entire figure eliminate the sense of volume, whereas jagged tufts at shoulders, back, and tail base suggest three-dimensional form.
Attempting to add intricate details before cleaning up loose construction lines results in confusing visual overlap. Erase all auxiliary circles and grid marks before applying final outlines or color.
How Long Does It Take to Draw a Cat?
Time requirements vary significantly based on stylistic complexity and the artist’s familiarity with basic shapes. Educational resources suggest the following progression for beginners:
- Material setup: 1-2 minutes to arrange pencils, erasers, and reference photographs
- Structural foundation: 5-10 minutes for light circles, grid lines, and basic shape outlines
- Feature refinement: 10-15 minutes to develop facial details, paw positioning, and fur direction indicators
- Surface finishing: 15-30 minutes for layering colors, adding shadows, and finalizing texture details
Source documentation indicates that basic pencil sketches require 10-30 minutes, while colored and shaded compositions extend to 45-60 minutes for beginners. Grid-based methods may increase initial setup time but reduce overall correction needs.
What Is the Easiest Way to Draw a Cat?
| Established Methods | Uncertain Variables |
|---|---|
| Circle-based construction provides consistent results for sitting poses | Individual motor skill development rates vary significantly |
| Grid transfer ensures facial symmetry for beginners | Optimal paper texture depends on personal preference and medium |
| Light pencil pressure allows complete erasure of errors | Specific color palette selection remains subjective |
| Cartoon styles reduce anatomical precision requirements | Definitions of “cute” versus “realistic” lack universal standards |
Why Do Proportions Determine Drawing Success?
Anatomical accuracy relies on specific ratios that distinguish felines from other quadrupeds. The head and chest typically share equal circular dimensions in sitting poses, while the body extends 1.5 times larger and overlaps the chest circle halfway down. These structural relationships prevent the common error of drawing heads too large or bodies too elongated. Text Message RCS Meaning – Full Features and Setup Guide
Spinal curves arch naturally from the skull over the shoulders to the rump, creating the distinctive feline silhouette. Understanding these spatial relationships allows artists to position paws correctly tucked beneath the chest and tails wrapping naturally around the body rather than appearing as disconnected appendages.
Professional drawing guides note that mastering these proportional basics transfers directly to rendering other mammals, making cat drawing an excellent foundation for broader artistic development.
What Do Art Tutorials Recommend for Beginners?
Draw whiskers on overlay paper first, then transfer via indent for clean lines.
— Art is Fun Tutorial
Use a light pencil touch for loose sketching, allowing easy erasing of guidelines.
— YouTube Drawing Tutorial
How Can Beginners Start Drawing Cats Today?
Beginners should gather basic supplies—a pencil, kneaded eraser, and drawing paper—then practice the circle-and-grid methods outlined above. Starting with simple shapes rather than detailed lines builds confidence while developing technical accuracy. Phone Repair Near Me – Top Shops Costs Times Tips Consistent practice of these fundamental steps produces recognizable feline portraits within the first drawing session.
Frequently Asked Questions
What materials do I need to draw a cat?
Essential supplies include a graphite pencil, kneaded rubber eraser, drawing paper, and optional colored pencils or markers. Light pencil pressure allows easy correction during initial sketching phases.
How do I avoid smudging my cat drawing?
Avoid resting your hand directly on the paper while drawing. Use a scrap piece of paper under your hand, and apply fixative spray after completion to set graphite or charcoal.
Can I draw a cat without using a reference photo?
While possible, reference photos ensure accurate proportions and feature placement. Beginners benefit from grid-method transfers, while advanced artists may work from memory or imagination.
Why does my cat drawing look flat?
Smooth continuous outlines create two-dimensional appearances. Adding jagged fur tufts at joints and using directional shading creates volume and texture.
How do I draw whiskers cleanly?
Draw whiskers on a separate overlay sheet, then indent the line onto your main paper. This transfers a faint groove that guides ink or dark pencil without preliminary sketch marks.
What age is appropriate for learning cat drawing?
Children as young as five can manage simplified shape-based cats, while detailed realistic techniques suit ages ten and up depending on fine motor skill development.
How do I choose between cartoon and realistic styles?
Cartoon styles suit quick, expressive work and require less precision, while realistic drawing demands grid methods and anatomical reference. Beginners often start with cartoon techniques to build confidence.
More related posts
 How Many Oz of Water Per Day – Science-Backed Daily Guidelines
 Mazda CX-30 Review: Reliable Compact SUV for Ireland?
 Alan Jackson: Health Condition, Career, and Personal Life
 Pat Morita: Health, Martial Arts & Friendship with Macchio
 Keith Urban: Health, Marriage, and Tom Cruise’s Rare Comment
 David Gilmour: Life, Career & Legacy of Pink Floyd’s Guitarist
 7 Feet in Inches: Converter, Chart & Height Guide
 Cameron Whitcomb After American Idol: Career & Tour
